
Mattermost 설치
자신만의 채팅 플랫폼 Mattermost 설치를 위해 먼저 Mattermost에 대해 알아보자.
Mattermost는 회사나 프로젝트 팀에서 소통할 수 있는 Slack, 카카오톡과 같은 채팅 플랫폼이다.
필자의 경우는 필자의 형제들 가족끼리 카카오톡 단톡방을 사용하여 소통하였는데
여러가지 이유로 카카오톡을 졸업하고 싶었다.
오픈소스 플랫폼을 찾아봤고 서베이 결과 Mattermost 가 Slack의 롤모델 이였다는 것도 알게 되고
웹페이지, PC(윈도우즈/맥OS), 모바일(안드로이드, 아이폰) 등 다양한 디바이스를 지원하는 애플리케이션이라는것을
알고 설치하여 몇 년 동안 잘 사용 중이다.
사용하면서 장점은 카카오톡보다 더 자유로운 소통을 할 수 있고
Immich와 연동하여 채팅 플랫폼에서 오고 가는 사진들을 자동 백업도 가능하게 설정하는 등
다양한 응용이 가능하여 좋은 시도였다고 생각한다.
Docker Compose를 이용하면 여러 구성 요소를 쉽게 설치하고 편리하게 관리할 수 있다.
이 글을 통해 여러분은 Mattermost 설치를 통하여
자신만의 서버를 운영하기 위한 기본적인 설정을 완료 할 수 있다.
이를 설치하기 위해서
아래와 같은 순서대로 따라하면
자신 만의 카카오톡과 같은 채팅 서버 설정 완료하고
친구들과 함께 사용 할 수 있다.
- Docker-compose 설치
- Mattermost 설치 환경 준비
- DNS 확보
- Docker 실행
- Nginx Proxy Manager 설치 및 설정
- mattermost 실행
- Sendmail 설정
Docker-compose 설치
다른 글에서 Docker-compose 설치 및 활용에 대해 여러 번 다루었다.
Docker 또는 Docker-compose를 활용하면 물리적인 서버에 여러 개의 가상화 된 서버를 운용 할 수 있다.
하나의 아파트의 여러 가정이 비슷한 구조로 있는 것을 비유를 들어 설명하기도 하였다.
아래 글을 활용하시면 Docker-compose 의 설치 및 준비를 마칠 수 있다.

Mattermost 설치 환경 준비
자신만의 채팅 플랫폼 Mattermost 설치를 위해서 github로 부터 Mattermost 가장 최신의 이미지를 활용 및
기본 환경 구성하는 shell을 만들어 보았다.
이를 install.sh로 만들어 재 활용할 수 있고 단순히 실행만 하여도 충분하다.
it clone https://github.com/mattermost/docker    #새로운 이미지 내려 받기
cp docker/env.example .env  #환경 파일 카피
mkdir -p ./volumes/app/mattermost/{config,data,logs,plugins,client/plugins,bleve-indexes}  #기본 환경 구성을 위한 디렉토리 만들기
sudo chown -R 2000:2000 ./volumes/app/mattermost  #실행을 위한 디렉토리 owner 설정
cp docker/*.yml . #docker-compose를 위한 yml 파일 카피
위 스크립트는 github로 부터 이미지를 Download 하는 것 부터
yml 파일 카피 하는 기본 환경 구성 하는 스크립트 이다.
여기서 복사한 .env파일과 .yml 를 살펴 보겠다.
다음은 각 종 환경적인 변수를 다루는 .env파일이다.
# Domain of service
DOMAIN=mm.example.com

# Container settings
## Timezone inside the containers. The value needs to be in the form 'Europe/Berlin'.
## A list of these tz database names can be looked up at Wikipedia
## https://en.wikipedia.org/wiki/List_of_tz_database_time_zones
TZ=UTC
RESTART_POLICY=unless-stopped

# Postgres settings
## Documentation for this image and available settings can be found on hub.docker.com
## https://hub.docker.com/_/postgres
## Please keep in mind this will create a superuser and it's recommended to use a less privileged
## user to connect to the database.
## A guide on how to change the database user to a nonsuperuser can be found in docs/creation-of-nonsuperuser.md
POSTGRES_IMAGE_TAG=13-alpine
POSTGRES_DATA_PATH=./volumes/db/var/lib/postgresql/data

POSTGRES_USER=mmuser
POSTGRES_PASSWORD=mmuser_password
POSTGRES_DB=mattermost

# Nginx
## The nginx container will use a configuration found at the NGINX_MATTERMOST_CONFIG. The config aims
## to be secure and uses a catch-all server vhost which will work out-of-the-box. For additional settings
## or changes ones can edit it or provide another config. Important note: inside the container, nginx sources
## every config file inside */etc/nginx/conf.d* ending with a *.conf* file extension.

## Inside the container the uid and gid is 101. The folder owner can be set with
## `sudo chown -R 101:101 ./nginx` if needed.
NGINX_IMAGE_TAG=alpine

## The folder containing server blocks and any additional config to nginx.conf
NGINX_CONFIG_PATH=./nginx/conf.d
NGINX_DHPARAMS_FILE=./nginx/dhparams4096.pem

CERT_PATH=./volumes/web/cert/cert.pem
KEY_PATH=./volumes/web/cert/key-no-password.pem
#GITLAB_PKI_CHAIN_PATH=<path_to_your_gitlab_pki>/pki_chain.pem
#CERT_PATH=./certs/etc/letsencrypt/live/${DOMAIN}/fullchain.pem
#KEY_PATH=./certs/etc/letsencrypt/live/${DOMAIN}/privkey.pem

## Exposed ports to the host. Inside the container 80, 443 and 8443 will be used
HTTPS_PORT=443
HTTP_PORT=80
CALLS_PORT=8443

# Mattermost settings
## Inside the container the uid and gid is 2000. The folder owner can be set with
## `sudo chown -R 2000:2000 ./volumes/app/mattermost`.
MATTERMOST_CONFIG_PATH=./volumes/app/mattermost/config
MATTERMOST_DATA_PATH=./volumes/app/mattermost/data
MATTERMOST_LOGS_PATH=./volumes/app/mattermost/logs
MATTERMOST_PLUGINS_PATH=./volumes/app/mattermost/plugins
MATTERMOST_CLIENT_PLUGINS_PATH=./volumes/app/mattermost/client/plugins
MATTERMOST_BLEVE_INDEXES_PATH=./volumes/app/mattermost/bleve-indexes

## Bleve index (inside the container)
MM_BLEVESETTINGS_INDEXDIR=/mattermost/bleve-indexes

## This will be 'mattermost-enterprise-edition' or 'mattermost-team-edition' based on the version of Mattermost you're installing.
MATTERMOST_IMAGE=mattermost-enterprise-edition
## Update the image tag if you want to upgrade your Mattermost version. You may also upgrade to the latest one. The example is based on the latest Mattermost ESR version.
MATTERMOST_IMAGE_TAG=8.1.9

## Make Mattermost container readonly. This interferes with the regeneration of root.html inside the container. Only use
## it if you know what you're doing.
## See https://github.com/mattermost/docker/issues/18
MATTERMOST_CONTAINER_READONLY=false

## The app port is only relevant for using Mattermost without the nginx container as reverse proxy. This is not meant
## to be used with the internal HTTP server exposed but rather in case one wants to host several services on one host
## or for using it behind another existing reverse proxy.
APP_PORT=8065

## Configuration settings for Mattermost. Documentation on the variables and the settings itself can be found at
## https://docs.mattermost.com/administration/config-settings.html
## Keep in mind that variables set here will take precedence over the same setting in config.json. This includes
## the system console as well and settings set with env variables will be greyed out.

## Below one can find necessary settings to spin up the Mattermost container
MM_SQLSETTINGS_DRIVERNAME=postgres
MM_SQLSETTINGS_DATASOURCE=postgres://${POSTGRES_USER}:${POSTGRES_PASSWORD}@postgres:5432/${POSTGRES_DB}?sslmode=disable&connect_timeout=10

## Example settings (any additional setting added here also needs to be introduced in the docker-compose.yml)
MM_SERVICESETTINGS_SITEURL=https://${DOMAIN}
2번째 라인의 DOMAIN은 확보 된 DNS를 설정 하는 부분이 있습니다.
이 부분의 확보된 DNS를 설정하면
지인들이 활용하는데 편하게 커뮤니케이션 할 수 있습니다.
DNS 확보
이 전 글(1. 도메인확보 부분)에서 유료 DNS에 대해 언급 하였다.
이 번 글은 무료 DNS에 대해 알아 보겠습니다.
위 .env 파일 2번째 라인에 mattermost240514.mooo.com이라 정의 했다고 하면
여기서 mattermost240514라고 하는 subdomain은 mooo.com이라는 DOMAIN의 하나로 정의 되어
사용 되어지는 구조 입니다.
아래 사이트에 접속 및 가입/로그인 하면 무료로 subdomain을 만들 수 있습니다.
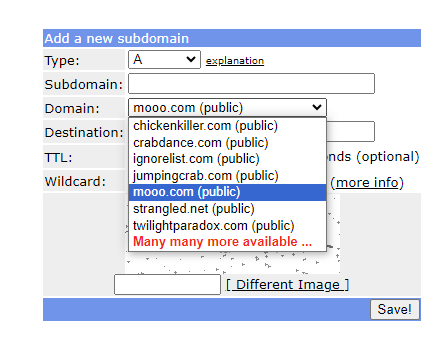
Domain은 mooo.com뿐만 아니라 여러개의 DOMAIN 중에 선택 하여 만들 수 있습니다.
아래는 사이트는 구글에서 free dns로 검색하면 나오는 여러 개의 사이트 중 하나 이다.
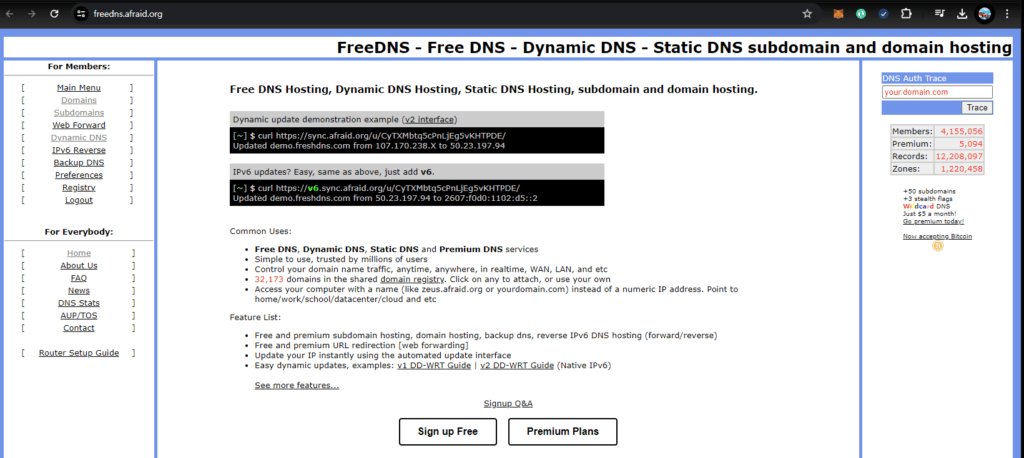
위 사이트에 로그인 하고
윈쪽 메뉴에서 ‘Subdomains‘를 클릭하면 다음 화면이 나온다.
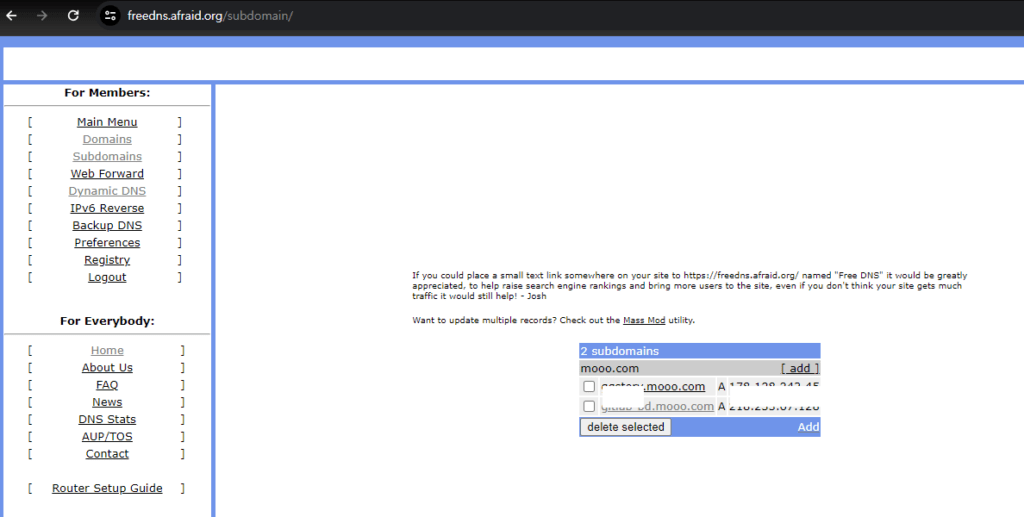
필자의 경우는 2개의 서브도메인을 확보하여 리스트업 된다.
‘Add’를 누르면 서브도메인을 확보하는 화면으로 바뀐다.
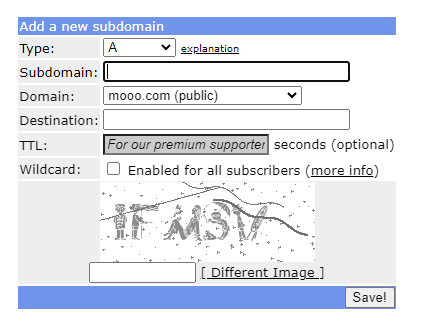
위 화면의 Subdomain에 mattermost240514 (mattermost+오늘날짜)를 테스트 삼아 만들어 보았다.
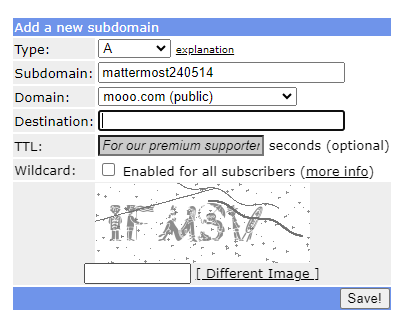
Destination에 자신의 공공IP를 적고,
캡차 보안 문자를 입력하고
Save를 누르면
mattermost250514.mooo.com으로 매핑 된다.
물론, mooo.com의 여러 subdomain중에 겹치지 않았을 경우에 한정 된다.
겹칠 경우 겹치지 않을 subdomain명을 선택하여 다시 시도 하기 바란다.
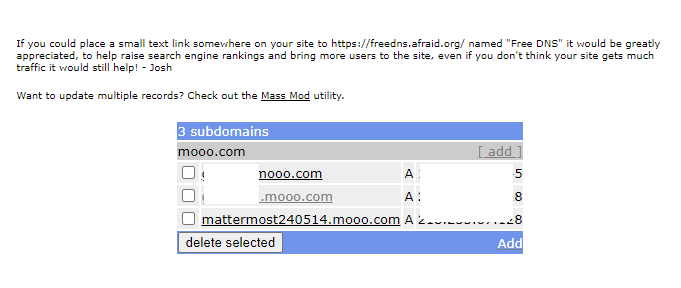
추가에 성공하면 위 화면을 볼 수 있다.
무료 DNS이다 보니 반영 되는데 10분 이상 소요 되는 것 같다.
nslookup mattermost240514.mooo.com 이라 command 창에 기입하여 IP가 잘 매칭 되어 있는지 확인 할 수 있다.
Docker 실행
자 도메인도 확보 되었으니 .env파일에 추가하고 Docker를 실행 한다.
sudo docker-compose -f docker-compose.yml -f docker-compose.without-nginx.yml up -d
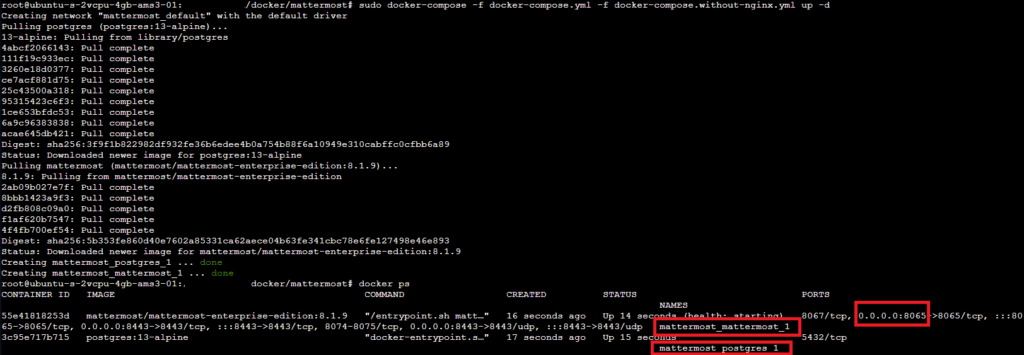
위 화면을 실행 화면 이다. 정상 실행 되는 지 확인하기 위해 ‘docker ps’를 실행하면 실행 되는 docker container가 리스트업된다.
위 화면과 같이 docker ps에 정상적으로 실행 되고 있는 것을 확인 했다.
위 화면의 빨간박스를 확인하면 2개의 container와 8065 포트가 리스닝 되는 것을 확인 할 수 있다.
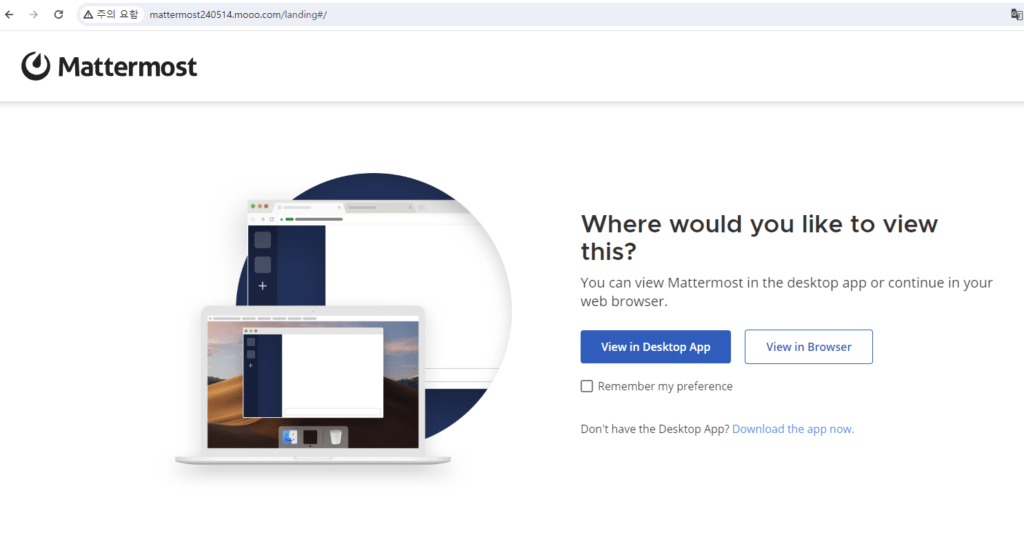
아래 화면은 단순 IP:8065로 접속해 나오는 실행 성공 화면이다.
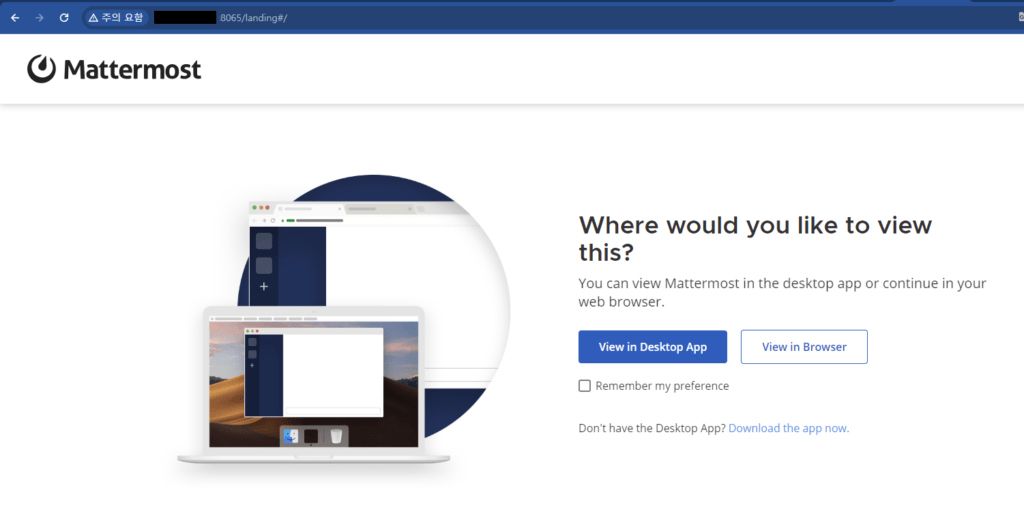
위 화면의 ‘View in Browser’을 누루거나 바로 다음 화면이 나오면 성공이다.
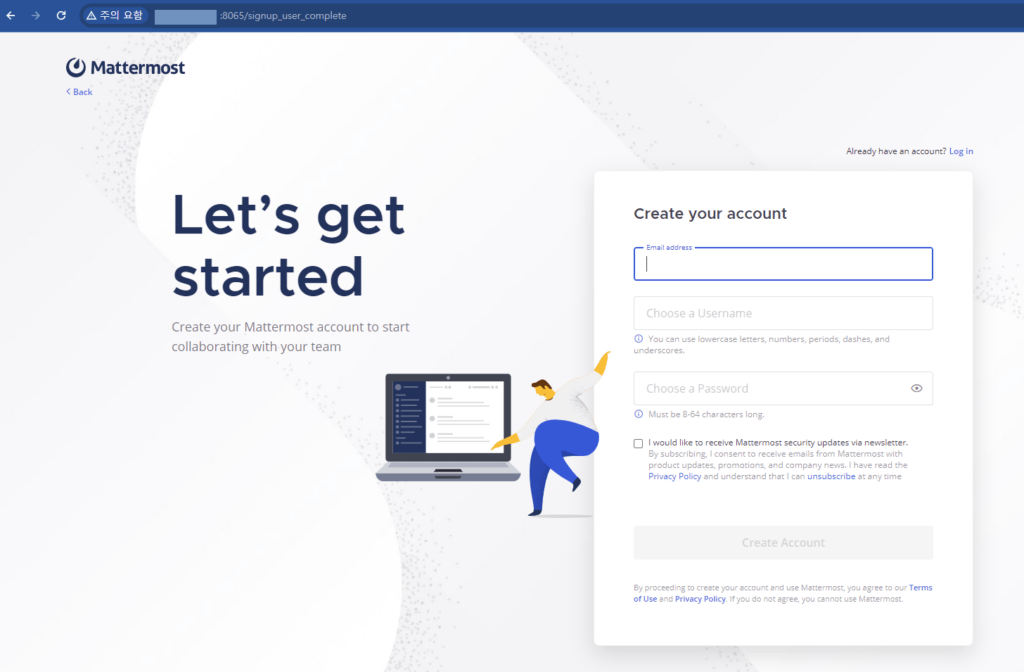
위 화면은 mattermost의 admin을 설정 하는 화면 이다.
이 설정을 통해 모든 제어와 권한을 갖는다. 슈퍼유저 설정시 패스워드를 잘 기억하기 바란다.
이 후, 조직명, 도구들, link등을 클릭으로 스킵하면 다음 홈 화면을 확인 할 수 있다.
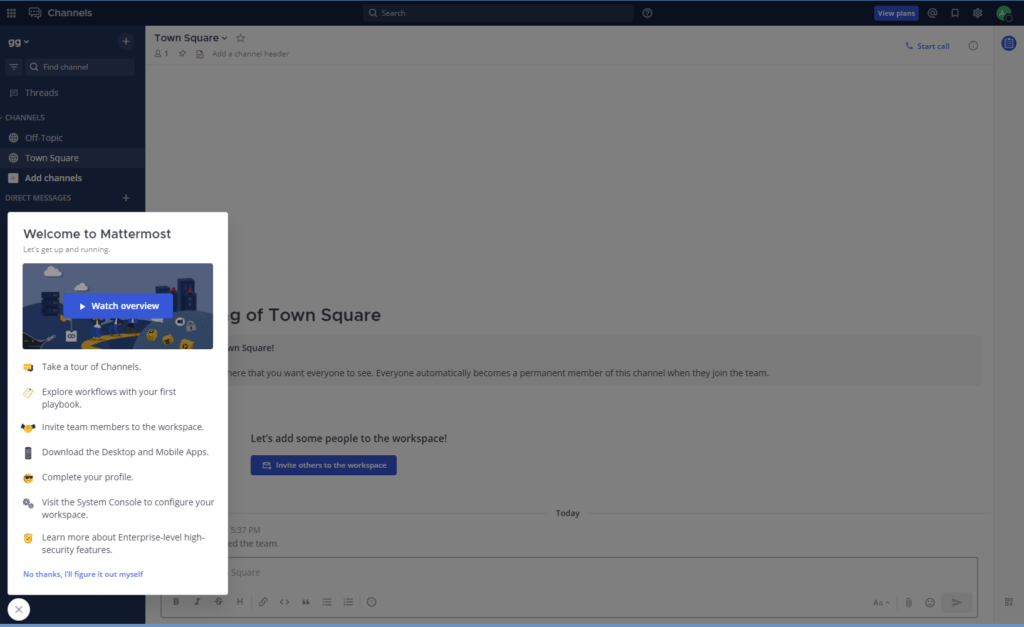
자 여기까지 왔으면 거의 성공이다.
이제 domain으로 접근 방법과 초대가 메일로 이루어지는 관계로 sendmail 설정을 하여야 다른 지인들을 초대 할 수 있다.
하나씩 설정 하여 보자.
우선 domain 접근을 위하여 nginx prox manager를 설치 및 설정 하여야 한다.
Nginx Proxy Manger 설치와 설정
설치 방법과 설정 방법은 이전 글(4.Nginx Proxy Manager 부분)을 참조하면 기본적인 설치와 설정 방법을 습득 할 수 있다.
추가적으로 설정 하는 부분을 설명 하고자 한다.
IP:81로 로그인, Hosts탭의 ‘Proxy Hosts’선택, ‘Add Proxy Host’클릭하여 아래 화면과 같이 설정한다.
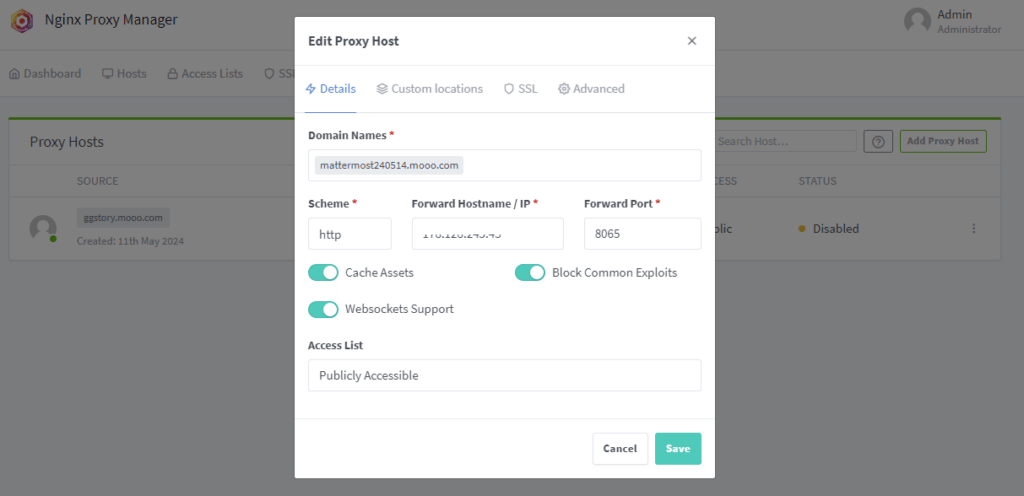
설정을 Save하고 웹 브라우저에 http://mattermost240514.mooo.com으로 접속하여 dns를 통한 설정이 완료 되었는지 확인한다.
이제 DNS를 통한 접속까지 설정 하였다.
mattermost 에서 지인들을 초대하기 위해서는 초대메일을 발송으로 지인을 추가 할 수 있다.
따라서, sendmail설정이 되어야 지인이 초대메일을 받을 수 있다.
Sendmail 설정
설정을 위해서는 왼쪽 상단의 9개의 네모 아이콘을 클릭하면 System Console 메뉴를 확인 할 수 있다.
이를 클릭한다.
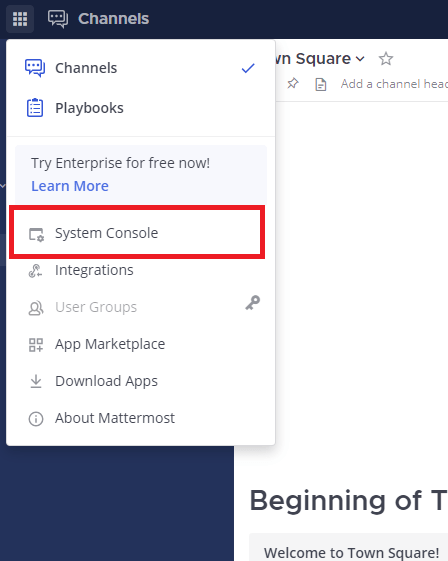
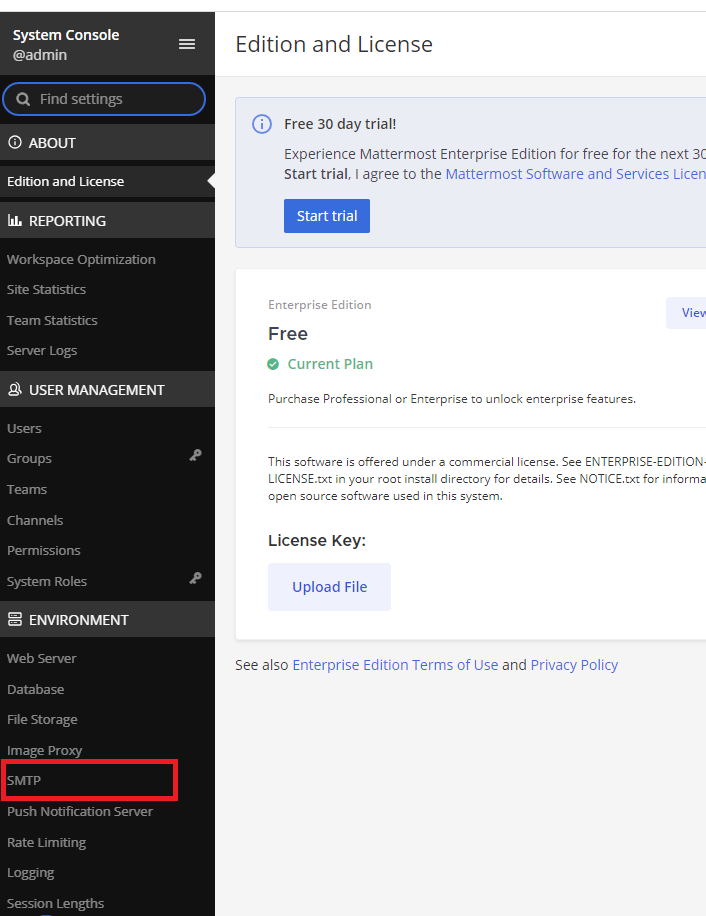
System Console은 시스템의 전반적인 설정을 할 수 있는 메뉴이다. 이 메뉴가 펼쳐지면 ‘ENVIRONMENT’ 그룹에 SMTP를 클릭한다.
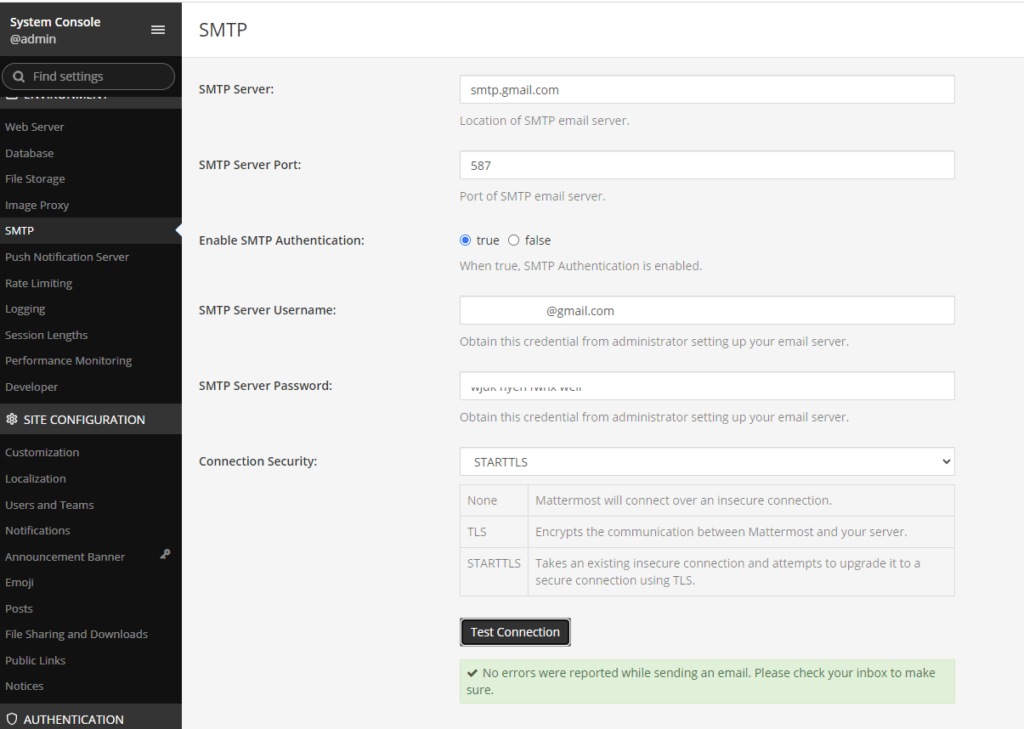
아래 화면은 SMTP설정 화면이다.
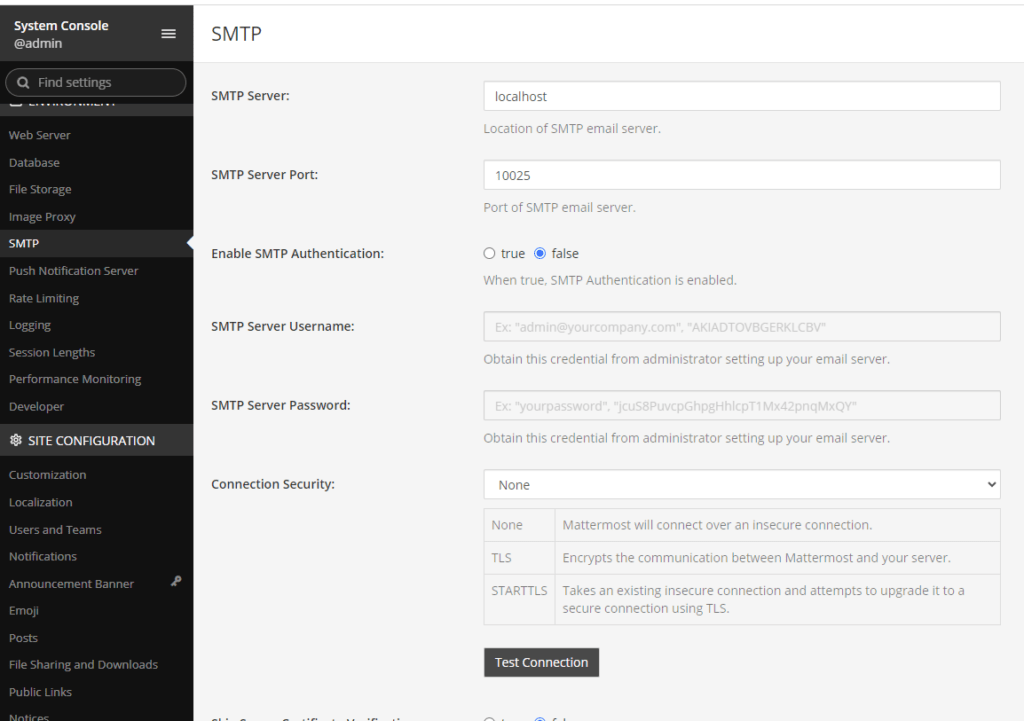
구글 메일을 활용하여 Sendmail을 설정하는 부분으로 설명 하려 한다.
SMTP Server는 smtp.gmail.com
포트는 587
Enable SMTP Authentication은 true
SMTP Server Username 은 사용자의 gmail 주소
SMTP Server Password는 앱비밀번호
Connect Security 는 STARTTLS 을 설정하고
Test Connection을 눌러 설정을 확인한다.
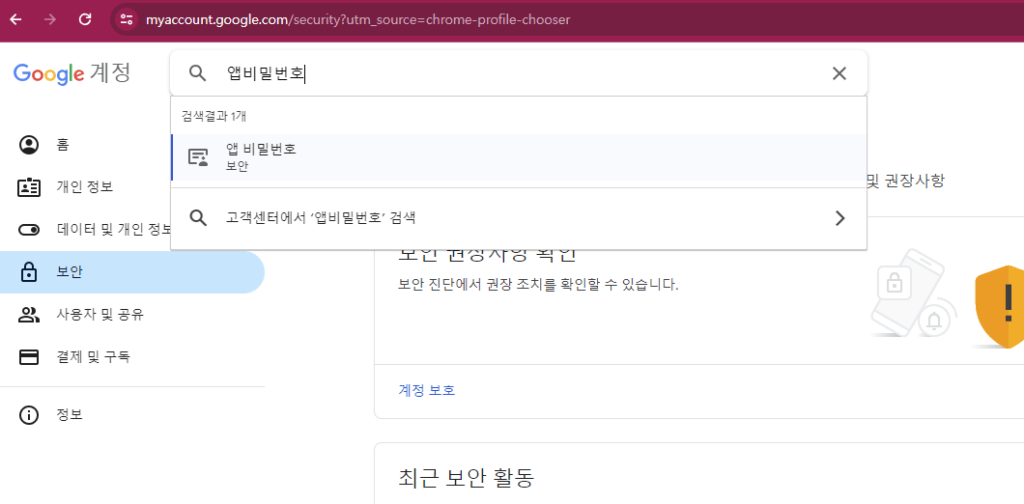
위 설정 값 중에 Username 과 Password 의 설정은 구글의 2단계 인증을 한 상태에서 오른쪽 상단의 ‘Google 계정 관리’를 클릭하면
Google설정 화면으로 이동한다. 왼쪽 메뉴 보안 탭을 선택하고 검색창에서 ‘앱비밀번호’라고 찾는다.
위 화면으로 검색하여 ‘앱비밀번호’를 클릭하면 다음 화면으로 이동한다.
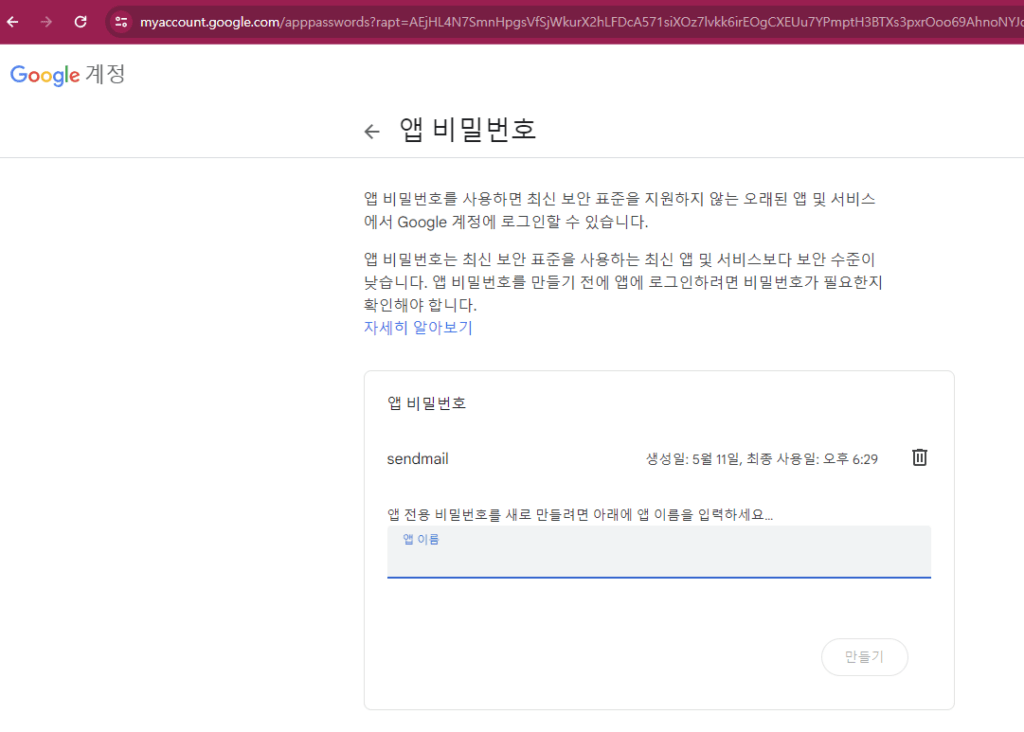
위 화면은 필자의 gmail 앱비밀번호 란으로 하나 이미 만들어저 있다. 여기서 sendmail2를 만들어 보겠다.
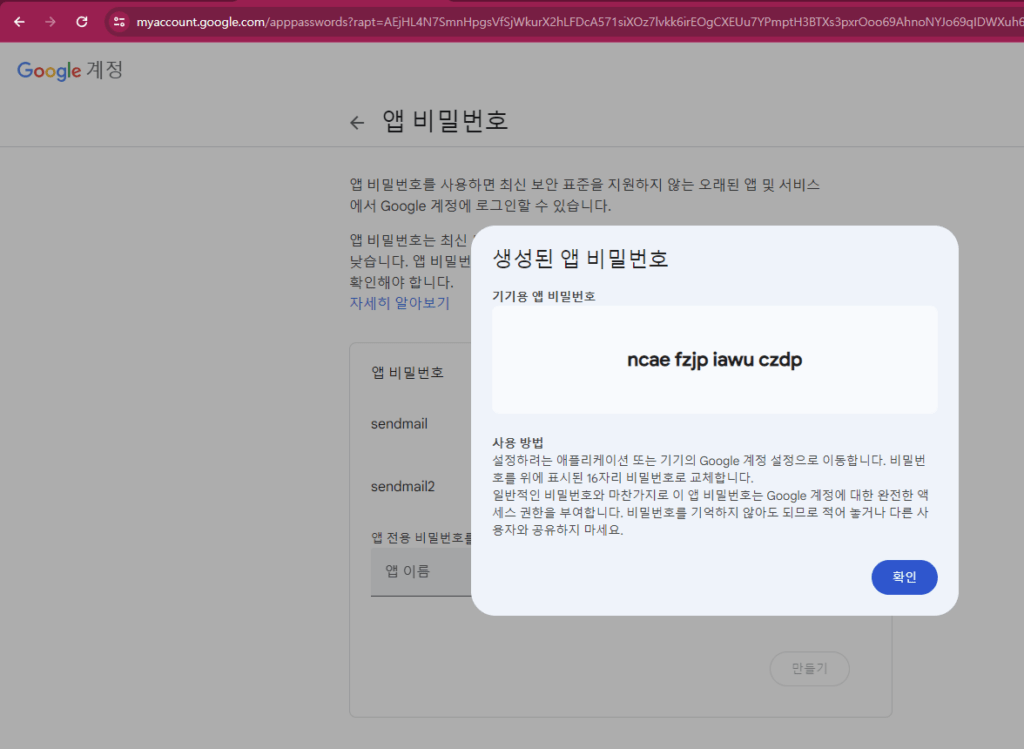
sendmail2를 입력하면 바로 비밀번호가 생성되어 표시된다. 여기 표시 된 비밀번호를 잘 메모하여 기억하기 바란다.
위 비밀번호를 System Console의 SMTP설정에 Username엔 xxxx@gmail.com, Password : nace fzjp iawu czdp와 같이 입력하고
아래 ‘Test connection’을 클릭하면 성공 메시지가 초록색으로 아래 화면과 같이 표시된다.
자 Sendmail설정도 완료 되었다.
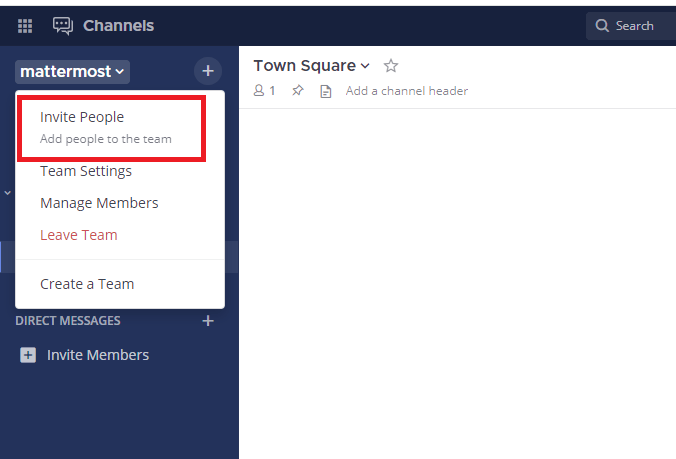
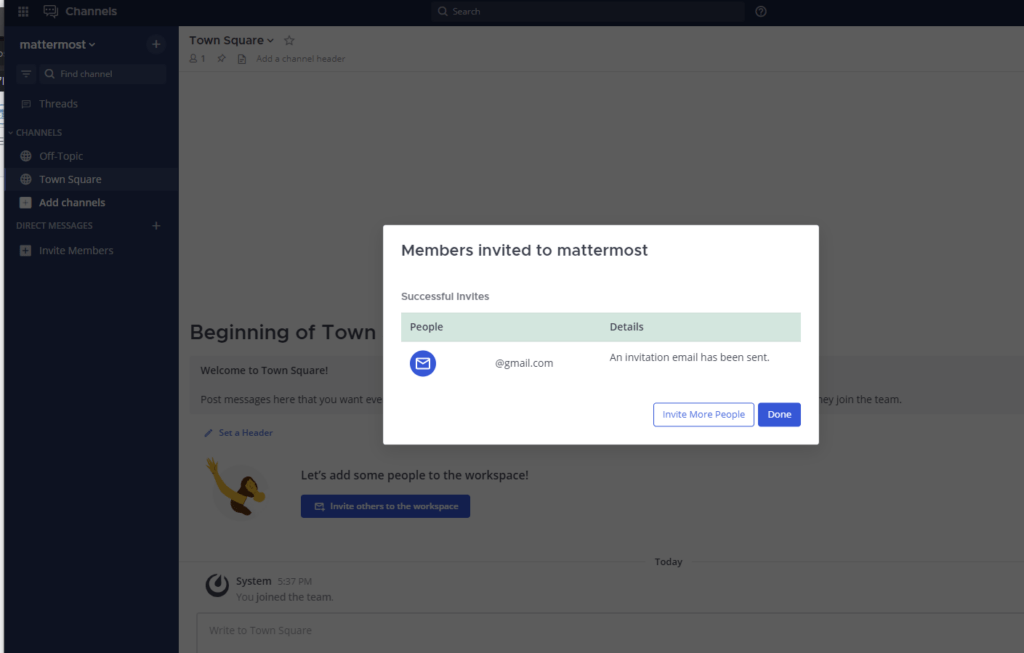
이제 지인을 초대 해보자.
채널명을 누르고 Invite People의 메뉴를 클릭하면 다음과 같은 화면이 표시된다.

초대할 이 메일을 기입하고 ‘Invite’클릭하면 아래와 같이 메일 발송 성공 메시지를 확인 할 수 있다.
여기까지 자신만의 채팅 플랫폼 Mattermost 설치를 위한
설정을 완료 및 Mattermost 서비스를 런칭 했으며
지인도 성공적으로 초대하였다.
가족이나 친구 간에 채팅 플랫폼을 제공하여 잘 활용하기 바란다.
다음 시간에는 간단한 활용 및 백업과 복구하는 내용을 준비하고자 한다.
여기까지 어려운 설정을 따라 오시느라 고생한 여러분께 응원의 박수를 보낸다.
감사합니다.
“오픈소스 채팅 플랫폼 Mattermost 설치(Docker)”에 대한 10개의 생각
댓글은 닫혔습니다.